Using BusyCal with Zoom
Zoom is a market leading online video conferencing solution. BusyCal can connect to your Zoom account and enable you to add video / audio conferencing calls to existing meetings or new events with just a click.
Adding your Zoom account
To sync BusyCal with Zoom, do the following:
- Choose BusyCal > Settings > Accounts.
- Click the + (plus) button to add a new account.
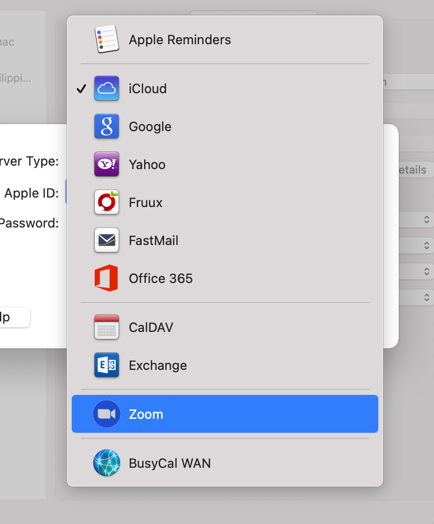
- Choose Zoom from the Server Type pop-up menu and click OK.

Adding Zoom meetings to events
You can add a Zoom meeting to an existing event as well as a new event. This works for your On My Mac calendars too. Meetings cannot be added to To Dos, however.
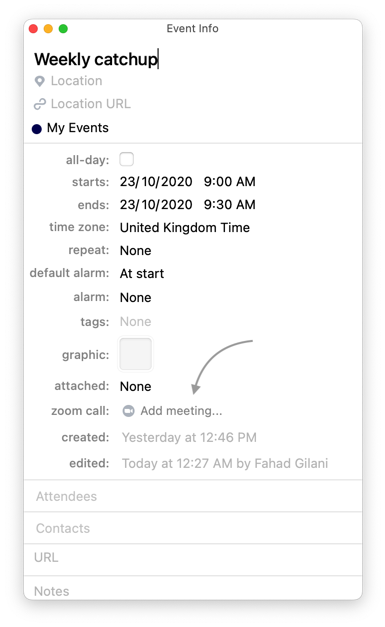
Once your Zoom account has been setup successfully, select any event to see a new option in the Info Panel, labelled "zoom call: Add meeting...".

Click on this button once to create a new Zoom meeting. You will see the button show "Pending..." briefly while it connects to Zoom to setup the meeting. Upon success, BusyCal will embed the meeting link within the notes section of the event, and optionally add a link to the Location (if you have that enabled under Settings > Accounts > Zoom).

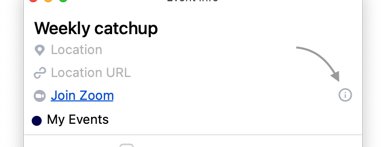
Please note that in order to protect this link from being accidentally deleted or modified, we hide it from view. You can still access the link by clicking on the "Copy to Clipboard" button next to the "Join button", or click on the (i) button below the event's title to access the hidden embedded notes section, as shown below.

Currently there is no way to customize individual meeting settings. Meeting settings are obtained directly from your Zoom account, including the timezone for the meetings or your meeting password requirements. Zoom will automatically add a password to your meeting if that has been setup in your Zoom account; BusyCal will simply request Zoom to create a meeting with your preferred settings. Whatever preferences and defaults you may have set, BusyCal will use those when creating or updating the meeting.
Updating Zoom meetings
Every time you make a change to an event with a Zoom meeting, BusyCal automatically refreshes the meeting with new dates, topic or agenda. You do not have to perform any manual steps separately. Having said that, BusyCal will not poll Zoom for updates. If you were to delete or modify the meeting manually using Zoom's website, these changes will not automatically reflect within BusyCal, unless you were to make a change to the event within BusyCal itself.
Recurring Meetings
Zoom offers a limited number of options when it comes to setting up a recurring meeting. Any time you add a meeting to a recurring event within BusyCal, an attempt is made to create a Zoom meeting based on this pattern. However this is not always possible given the limitations. This is especially true for detached events. For this reason, any time you detach a repeating event (i.e. alter its date to effectively create an exception to the original recurring pattern), BusyCal leaves the meeting link within the notes untouched, but in addition allows you to optionally replace it with a new meeting (by clicking "Add Meeting.."). This of course makes sense, given the meeting date and time has now changed.
Zoom, however, will continue to remind you of the meeting on the "wrong date", since it does not register such exceptions. You will need to ignore reminders coming from the Zoom app for those dates for now unfortunately, as there is no way around this limitation.
Uninstalling the BusyCal add-on from Zoom
You can remove Zoom from BusyCal, however this does not automatically deauthorize BusyCal from your account. If you'd like to deauthorize BusyCal from accessing your account entirely, please follow the second step described below.
⚠️ Troubleshooting
🛠️ I keep getting re-authorization requests
Zoom unfortunately does not support users authenticating their Zoom account in multiple devices at the same time, without requiring them to re-authenticate after a day. They invalidate all your other devices the moment you log into and authorize one device.
Zoom developer support has explained this here: https://devforum.zoom.us/t/anything-that-would-cause-all-refresh-tokens-for-a-user-level-app-to-go-bad/24186/2
The only thing you can do for now is to use either different accounts on each device, or use Zoom on only one device running BusyCal.
Please leave feedback with Zoom so that they may reconsider.
🛠️ I only see "Pending..."
When you click on "Create Meeting", it may take some time for the zoom meeting link to create, depending on other tasks BusyCal may be busy performing. At times it may be necessary for an ongoing sync to end before BusyCal is able to send a request to Zoom. Try clicking on Refresh Calendars from the View menu (CMD+R) to see if that helps.
🛠️ I cannot see zoom meeting links in event notes
This has been explained in the Add Zoom Meetings section above, that meeting links are hidden from notes for security reasons. These links however are always sent to the invitees and will always be visible to them. This is a BusyCal only feature, to prevent accidental removal / modifications etc.
🛠️ Meetings are not assigning a password
You need to log into zoom.us, click on Settings and then ensure you have enabled Require passcode for scheduled meetings. BusyCal will generate a random password for the meeting, based on the minimum password requirements set on your account.
🛠️ I see a Add meeting option for an event that already contains a Zoom Meeting
Zoom meetings can only later be removed from the same machine used to add the meeting. If the event in question already has a Join Zoom link visible near the event's title, but you see Add meeting button next to "zoom call:", this may suggest that the meeting was created on a different machine. This is not a bug and this does not affect the meeting in question. This simply means that the Zoom meeting related meta-data was saved on a different machine that cannot, due to technical limitations, sync over to your other machines.
🛠️ I see an error
Please contact us so we can go through the logs to identify the issue.
1. Removing Zoom from BusyCal
You can remove your Zoom account from BusyCal at any time. Simply open Preferences > Accounts, select Zoom in the left panel and then click [-] to remove the account. Existing meetings and links within event notes will not be removed. This is so that you remain in control of managing your Zoom meetings once the account has been removed. In case you add your account back into BusyCal, you can resume managing it directly from within the app.
You can also disable Zoom temporarily to take it offline for whatever reason. Open Preferences > Accounts, select Zoom and uncheck "Enable this account". When you do this, you will no longer be able to manage your meetings from BusyCal, and any pending updates waiting to be sent to Zoom will be deferred indefinitely until the account is re-enabled.
2. Uninstalling and Deauthorizing BusyCal from Zoom
- Login to your Zoom account and navigate to the Zoom App Marketplace.
- Click Manage > Installed Apps or search for BusyCal.
- Click on the BusyCal app listing.
- Click Uninstall
This will deauthorize the app from accessing Zoom.