Using BusyCal with CalDAV
CalDAV is an industry standard for calendar servers. BusyCal can connect to CalDAV servers, using them to sync calendars across your devices and share them with others.
For details on using BusyCal with CalDAV, see the following:
- Syncing with a CalDAV Server
- Sharing Calendars with Others through CalDAV
- Hosting Calendars on a CalDAV Server
Syncing with a CalDAV Server
caldav setup, caldav server address, caldav location address, caldav address location, caldav sync, caldav not working, caldav failing, caldav connection, caldav login, caldav authentication, caldav username password, caldav server location, caldav configuration, caldav account, caldav mac setup, caldav desktop setup
To sync BusyCal with a CalDAV server, do the following:
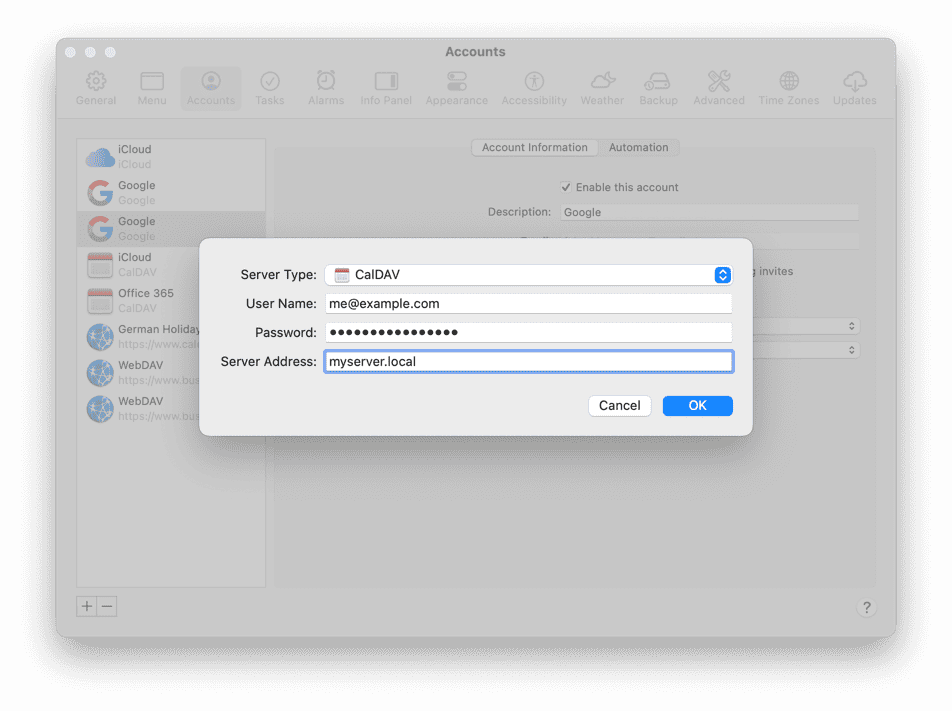
- Choose BusyCal > Settings > Accounts.
- Click the plus (+) button to add a new account.
- Choose CalDAV from the Server Type pop-up menu, and then enter your user name, password, and server address and click OK. For the server address, enter the domain (e.g., myserver.com), and BusyCal attempts to figure out the full path to your account.
- BusyCal begins syncing with the server and your calendars will appear in the left sidebar.

Sharing Calendars with Others through CalDAV
BusyCal enables you to share calendars with other users who are syncing with the same CalDAV server. Once each user has configured BusyCal to sync with their personal account on the CalDAV server, you can share calendars with each other. When a calendar is shared, events can be edited by any user, and changes sync between them.
Share a Calendar with Other CalDAV Users
To share a calendar with other CalDAV users:
-
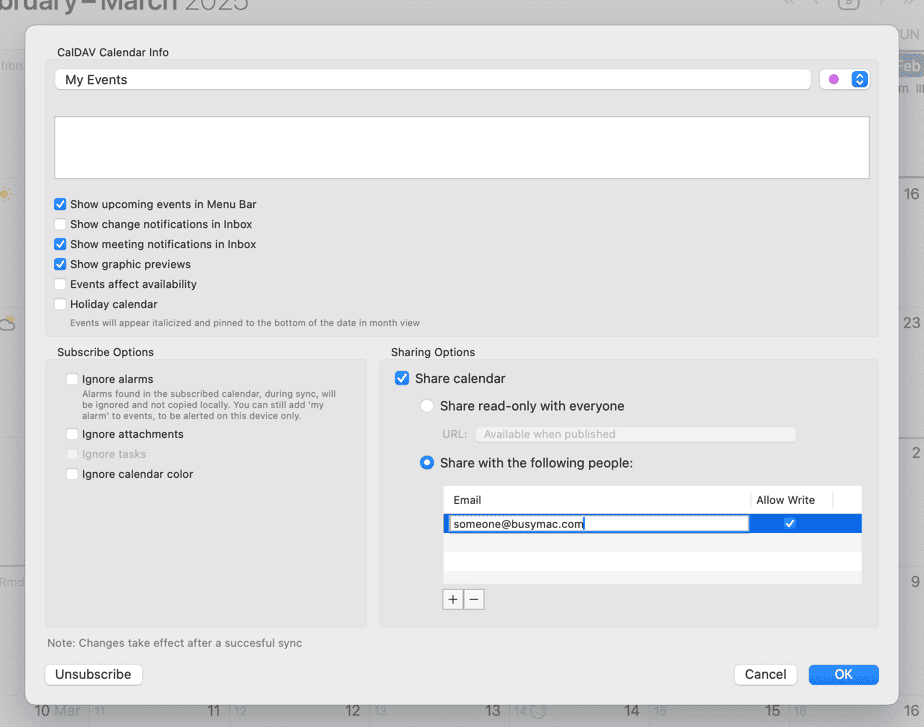
Control-click the calendar in the left sidebar and choose Get Info from the contextual menu, or simply double-click on the calendar name.
-
Enable the Share calendar checkbox, and then enter the email address of the person you want to share the calendar with. Check “Allow Write” if you want them to have read-write access to your calendar; otherwise, deselect it to give them read-only access.

- Click OK. BusyCal begins syncing with the server and an icon appears next to the calendar name indicating that it is shared.
- The person you shared the calendar with will receive an invitation to share your calendar. Once they accept the invitation, the shared calendar appears on their computer.
Shared Calendar Messages
When sharing calendars with others, there are two options you may want to enable, for keeping track of changes to events on shared calendars:
-
First, in BusyCal > Settings > Advanced > Other, select Confirm changes to events on shared calendars if you want to display a warning when you edit or delete an event on a shared calendar.
-
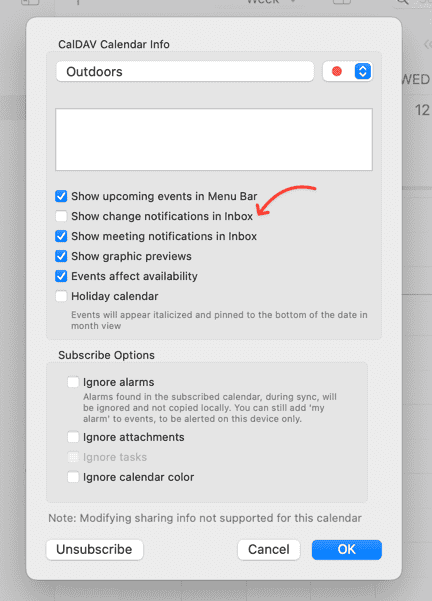
Second, in the Calendar Info dialog for any given calendar (which you can display by double-clicking the calendar name in the calendar side panel), select Show change notifications in Inbox to display a badge on the app icon and a message in the Inbox when events are added or changed by others, or deselect it to avoid seeing badges and Inbox notifications for that calendar.

- Open BusyCal > Settings > General and select Inbox Notifications under Dock badge count, if desired.
Hosting Calendars on a CalDAV Server
If you want to sync calendars between a macOS and iOS device or share calendars with others without having to rely on a cloud syncing service like iCloud or Google, you can host your own CalDAV server on your local area network.
BusyCal (for both Mac and iOS) and the built-in Calendar app on macOS and iOS are all client apps that sync with CalDAV servers. This means any data you enter into one client app will sync to all other client apps through the server. As long as you have all client apps configured to sync with the same server, all your calendar data remains in sync.
Calendars Must Be Hosted on Server
All calendars you want to sync between your Macs, iOS devices, and other users, must be hosted on the CalDAV server. You cannot sync calendars from other sources (On My Mac, iCloud, Google, Exchange, etc.) to the server.
If you have any existing calendars hosted elsewhere that you want to host on the server, you can move them to the server or merge them with an existing calendar on the server by following the instructions for Exporting, Importing and Merging Calendars.
Other CalDAV Servers
If macOS Server doesn’t meet your needs, you may want to consider other third-party servers, such as Kerio or Zimbra. Both servers support CalDAV and Exchange EWS protocols and are fully compatible with BusyCal.
There are also many service providers that provide Kerio and Zimbra hosting, including:
Delegates
For CalDAV servers that support delegation, you will see a Delegates option appear under account settings (BusyCal > Settings > Accounts > Selected account).
Here, you can edit and add email addresses of other users on the same CalDAV server that you would like to give access to.