Using BusyCal with Exchange / Office 365
Microsoft Exchange servers provide a number of online services, among which is syncing and sharing calendars. BusyCal can connect to Exchange servers, using them to sync calendars across your devices and share them with others.
The following applies to legacy Microsoft Office 365 accounts via Exchange Web Services (EWS). BusyCal now supports Microsoft's newest sync method: Microsoft Graph.
For details on using BusyCal with Exchange, see the following:
- Syncing with Exchange
- Sharing Calendars with Others through Exchange
- Hosting Calendars on Exchange
- Resources
- Microsoft Teams Conference Calls
- Exchange Limitations
Syncing with Exchange
BusyCal can use Exchange servers to sync calendar data across your devices.
To sync BusyCal with Exchange, do the following:
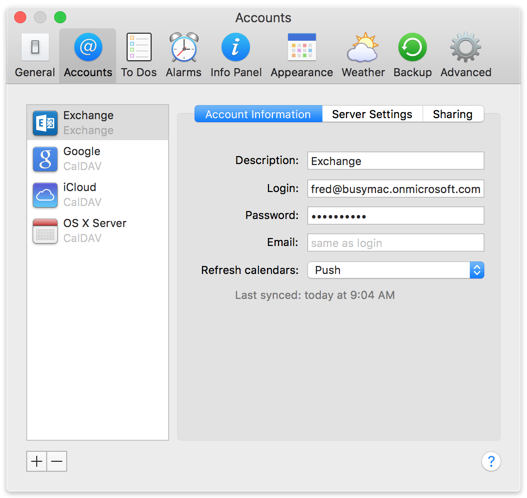
- Choose BusyCal > Settings > Accounts.
- Click the + (plus) icon to add a new account.
- Choose Exchange (or Office 365) from the Server Type pop-up menu, enter your Exchange email address and password, and click OK.
- The autodiscovery process begins and you may be prompted to enter additional login info. Once the process is complete, BusyCal syncs with Exchange.
Sharing Calendars with Others through Exchange
BusyCal enables you to share calendars with other Exchange users. Once each user has configured BusyCal to sync with their personal Exchange account, you can share calendars with each other through Exchange. When a calendar is shared through Exchange, events can be edited by any user and changes sync between them.
Calendar sharing involves two steps. First, the host must share calendars with one or more users. Second, the client must subscribe to the shared calendars from the host.
Share a Calendar with Other Exchange Users
You can share a calendar through Exchange with other Exchange users in your organization, as follows:
-
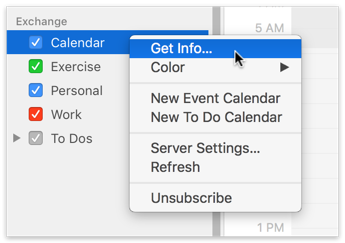
Control-click the calendar in the left sidebar and choose Get Info from the contextual menu.
-
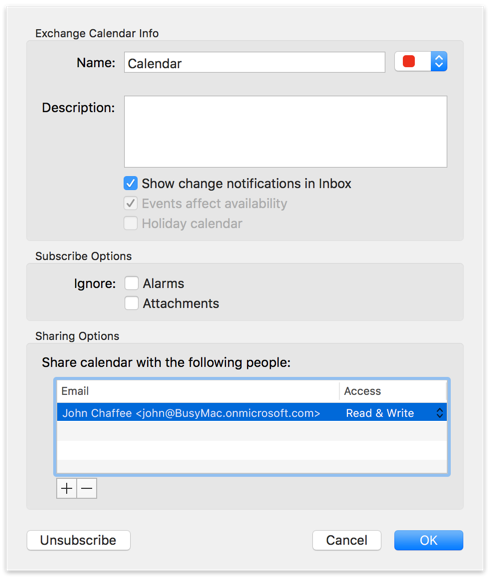
Click the plus (+) button and then enter the Exchange email address of the person you want to share the calendar with.
-
Choose the access privileges you want to grant them.
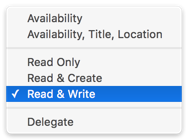
Choices are:
- Availability — User can view your Free/Busy time in the Availability Viewer but cannot view the details of the events. This option is available only for your primary calendar.
- Availability, Title, Location — User can view your event titles and locations in the Availability Viewer. This option is available only for your primary calendar.
- Read Only — User can view existing events but cannot create or edit them.
- Read & Create — User can view existing events and create new ones, but cannot edit existing ones.
- Read & Write — User can view, edit, and create events.
- Delegate — Same as Read & Write, plus user may create and respond to email meeting requests on your behalf. For more information on meeting invites when using Exchange, see Exchange Delegates.
-
Click OK. An icon appears next to the calendar in the left sidebar indicating that it is shared.
-
The person you shared with will need to add the shared calendar as described next.
To share a secondary calendar with someone, you must also share your primary calendar with them, with at least Availability access. Once you’ve granted someone Availability access or higher to your primary calendar, you can share secondary calendars with them.
Subscribe to Shared Calendars
BusyCal supports subscribing to secondary calendars shared to you by other Exchange users. When someone shares a calendar with you, they are usually presented with four options:
- Can view when I'm busy
- Can view titles and locations
- Can view all details
- Can edit
In order for BusyCal to be able to see these shared calendars, they must give you one of the last two available options. Can view all details will give you read-only access to their calendar, while Can edit will give you read / write access.
If someone has shared calendars with you through Exchange, you must configure your Exchange account preferences to show the shared calendars, as follows:
-
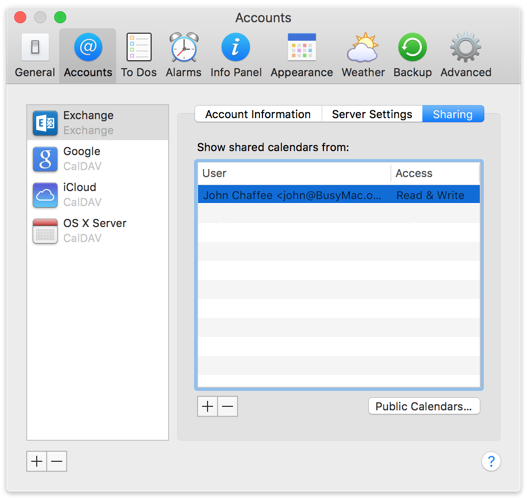
Choose BusyCal > Settings > Accounts, select your Exchange account in the list on the left, click the Sharing tab, click the plus (+) button, and enter the Exchange email address of the user who is sharing calendars with you.
-
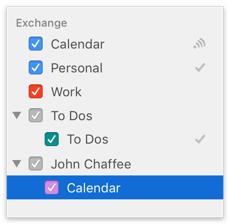
The shared calendars then show up in the left sidebar, where you can subscribe to them by selecting their checkboxes.
Public Calendars
Exchange supports public calendars that can be shared with all users in an organization. Public calendars are created by your network administrator.
To subscribe to a public calendar:
-
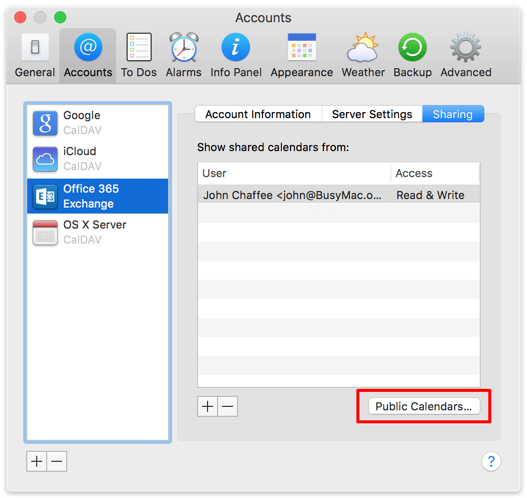
Choose BusyCal > Settings > Accounts, select your Exchange account in the list on the left, click the Sharing tab, and then click Public Calendars
-
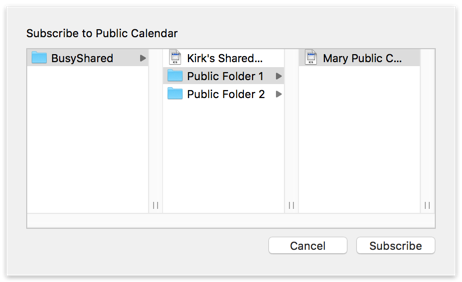
In the browser that appears, navigate to the public folder that contains the calendar you want to subscribe to. Select it and click Subscribe.
-
The public calendar appears in the left sidebar.

If you want to unsubscribe from a public calendar, Control-click it in the left sidebar and choose Unsubscribe from the contextual menu.
Notifications of Changes to Shared Calendars
When sharing calendars with others, there are two options you may want to enable, for keeping track of changes to events on shared calendars:
-
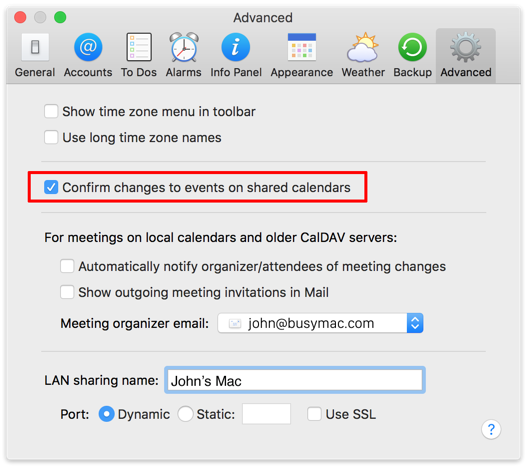
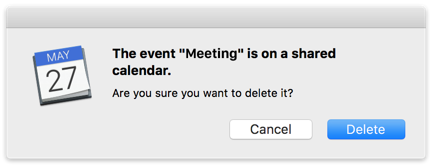
First, in BusyCal > Settings > Advanced, select “Confirm changes to events on shared calendars” if you want to display a warning when you edit or delete an event on a shared calendar.
-
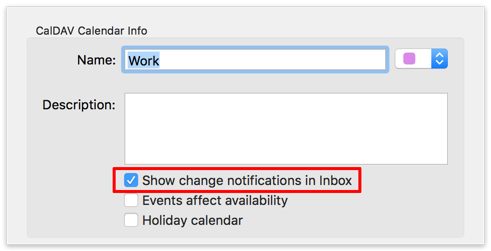
Second, in the Calendar Info dialog for any given calendar (which you can display by double-clicking the calendar name in the Calendar List), select “Show change notifications in Inbox” to display a badge on the app icon and a message in the Inbox when events are added or changed by others, or deselect it to avoid seeing badges and Inbox notifications for that calendar.

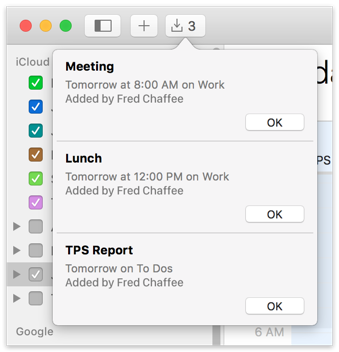
Click OK to dismiss each message in the Inbox. Or, hold down Option and OK changes to OK All, enabling you to dismiss all messages with a single click.
Hosting Calendars on Exchange
Exchange is a server that hosts your calendars and syncs them with client apps. BusyCal, Outlook, and the built-in Calendar app on macOS and iOS are all client apps that sync with Exchange.
This means any data you enter into one client app syncs to all other client apps through Exchange. As long as you have all client apps configured to sync with the same Exchange account, all your calendar and contact data remain in sync.
Resources on Exchange
Conference Rooms / Printers and other resources on an Exchange server can be added to events in BusyCal as an attendee. Simply typing in the name of the resource will auto-complete the resource name for you. You can then click on the "Available Meeting Times" option to open the Availability Viewer.
Calendars Must Be Hosted on Exchange
All calendars you want to sync between your Macs, iOS devices, and other users must be hosted on Exchange. You cannot sync calendars from other sources (On My Mac, iCloud, Google, etc.) to Exchange.
If you have any calendars hosted elsewhere that you want to host on Exchange, you can move them to Exchange or merge them with an existing calendar on Exchange.
Merge with a Calendar on Exchange
For this example, let’s say you have a local calendar called “Work” that you want to merge with an existing calendar on Exchange called “Fred.” Here’s how to do it:
-
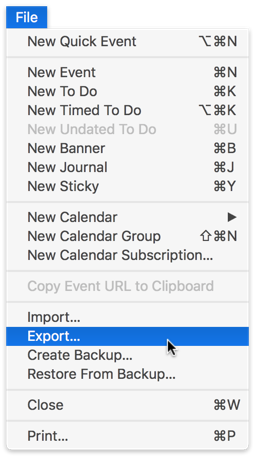
Export the Work calendar by selecting it in the left sidebar and choosing File > Export > Calendar File (.ics), and save it to your desktop. Then delete the Work calendar from BusyCal by Control-clicking on it and choosing Delete from the contextual menu.
-
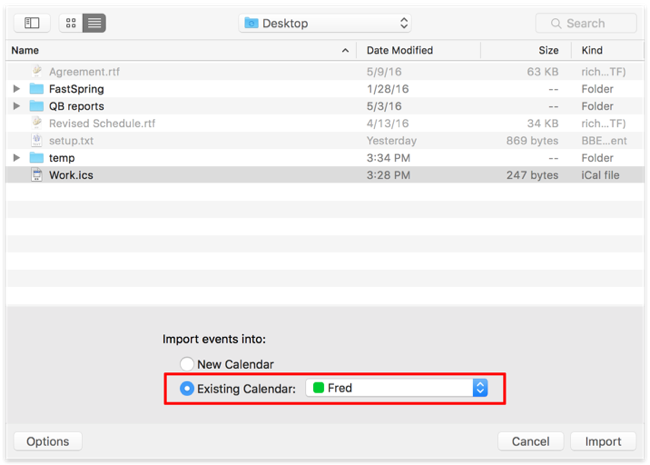
Choose File > Import and select the file you exported in step 1. If the “Import events into” section does not appear at the bottom of the dialog, click Options to display it. Select Existing Calendar and choose the Fred calendar (which is hosted on Exchange). BusyCal adds the events from the Work calendar to the Fred calendar on Exchange.
If there are any to dos stored in the calendar you exported in step 1, repeat this process and import them into a to do calendar in step 2.
After merging the calendars, you can remove duplicate events by choosing Help > Find Duplicates.
Move a Calendar to Exchange
For this example, let’s say you have a local calendar hosted on your Mac called “Home” that you want to host on Exchange. Here’s how you can move it to Exchange:
- Select the local Home calendar in the left sidebar, choose
File > Export > Calendar File (.ics), and save it to your desktop. After successfully exporting the Home calendar, delete it from BusyCal by Control-clicking it in the left sidebar and choosing Delete from the contextual menu. - Choose
File > New Calendar > Exchange > Event Calendarto create a new calendar hosted on Exchange and name it “Home.” - Choose
File > Importand select the file you exported in step 1 to import it. If the “Import events into” section does not appear at the bottom of the dialog, click Options to display it. Select Existing Calendar and choose the Home calendar (which is now hosted on Exchange). BusyCal adds the events from the old Home calendar to the the new Home calendar on Exchange.
If there are any to dos stored in the calendar you exported in step 1, repeat this process and create a new to do Calendar in step 2.
Microsoft Teams Conference Calls
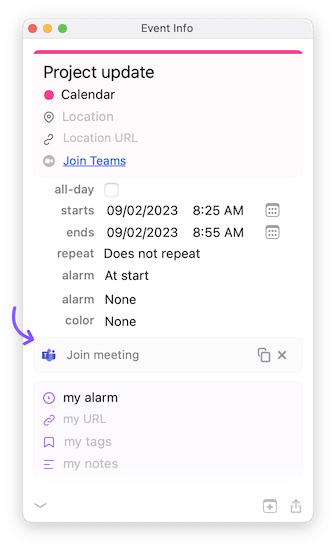
With version 2023.1.3 and above, you can add one-click Teams meetings to events / invitations. Simply open BusyCal Settings > Info Panel and make sure you have checked the Microsoft Teams option. You should now see a Add Meeting button appear in the Info Panel when editing events. Clicking on this button will automatically create a conference call (using Teams) and add it to the event.
Note: This option will only be visible for Office 365 accounts that have not disabled Teams in the Office 365 Portal for the specific calendar. This option will also only appear for Enterprise Office 365 accounts. If you have added this account in BusyCal as an Exchange account type, instead of an Office 365 account, this option will not be available.
First, make sure you have have enabled Microsoft Teams Integration for your account. Open BusyCal Settings > Accounts > Select your Office 365 account from the list and check the option.
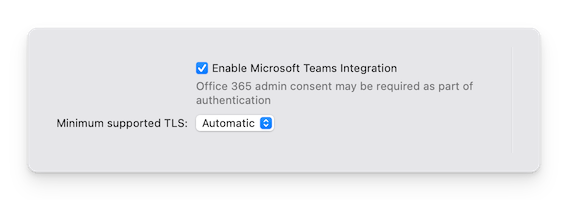
NOTE: This may not work for certain enterprise accounts where your administrator has not given your account access for 3rd party Teams integration. You may need to reach out to the O365 admin for consent / approval.
Next, still in Settings, click on the Info Panel toolbar option and scroll down to enable Microsoft Teams. This ensures that the option is visible at all times when editing events. Even when this is not enabled, you can always expand the Info Panel to show all hidden fields.
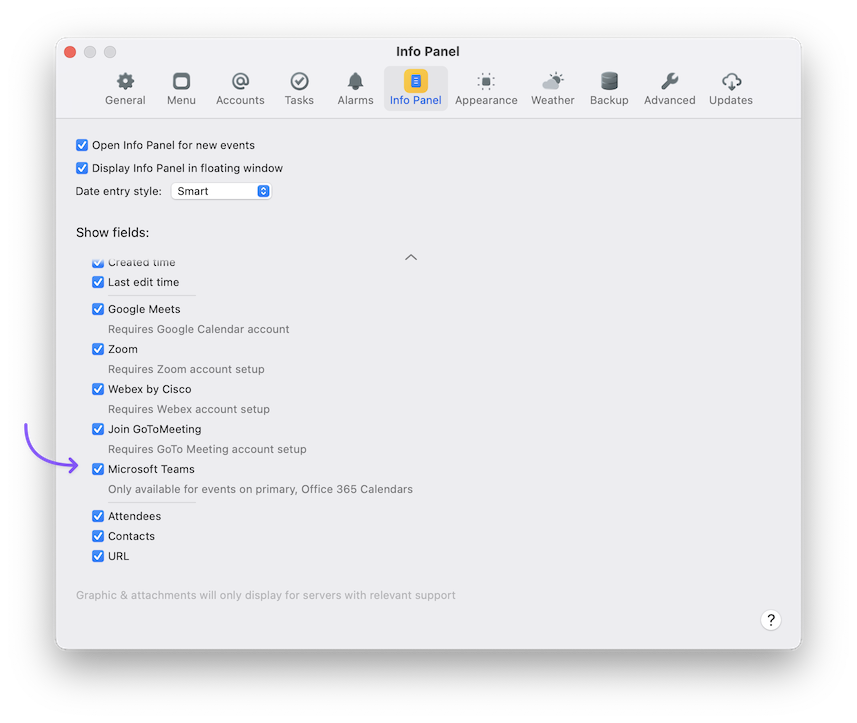
You should now be able to add Teams meetings to events that belong to your Office 365 account. Please note that if the option does not show up in the Info Panel, the calendar you're adding events to does not explicitly support / allow conference calls. This option is only available for calendars you own under an O365 account.
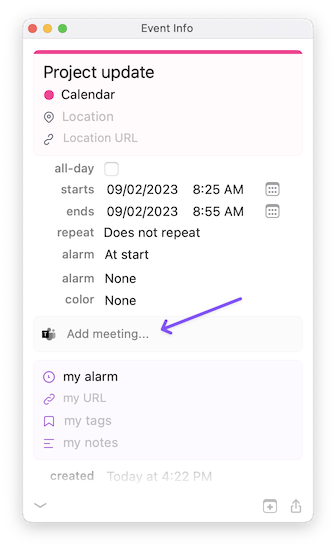
After clicking on the Add Meeting button, a meeting is automatically added for you during the next time the app performs syncs.
Exchange Limitations
Exchange places a number of limits on calendar data, which restrict the range of options you can use in BusyCal.
Due Times not supported for Tasks
Exchange and Office 365 (also known as Microsoft To Dos) do not support due times. You can only assign due dates to tasks.
Exchange Server Versions Supported
BusyCal supports Exchange 2007 SP3 and later, but BusyMac recommends Exchange 2013, which is more reliable than older versions.
Outlook.com Accounts
To connect to Outlook.com accounts, you must either select "Outlook" from the new Account settings or Exchange. Selecting Office 365 as the account type will not work as this option is only available for enterprise Office 365 accounts. See this article for more information.
Push
Push is not supported in Exchange 2007. Push is supported only in Exchange 2010 or later.
Sharing Secondary Calendars
To share a secondary calendar with someone, you must also share your primary calendar with them, with at least Availability access. Once you’ve granted someone Availability access or higher to your primary calendar, you can share secondary calendars with them.
Free/Busy Availability Viewer
Only events on your primary calendar affect your availability. Events stored on secondary calendars do not affect your availability and do not appear in the Availability Viewer as blocking your free time.
Floating Times
Floating Times are not supported by Exchange. If you create an event in floating time in BusyCal, it appears in GMT time in other apps.
Alarms
- Exchange allows only one alarm per event.
- Exchange does not allow Alarms to trigger after an event starts. If you create an alarm that triggers after the start of an event, it is converted to an “At start” alarm after syncing with Exchange.
Repeating Events
- If you create a repeating event with a recurrence rule that is illegal on Exchange, it is modified during syncing to be compatible with Exchange and your local copy is updated to match Exchange.
- Exchange doesn’t allow detached events (or alarms) to overlap the next/previous occurrence of the event.
WebDAV Subscriptions
iCloud enables you to sync WebDAV Subscriptions between your Mac and iOS device by setting the Location of the feed to iCloud. Exchange does not support this feature.
microsoft teams, teams, ms teams, teams conference call, team, team call, add team, insert team, create teams meeting, teams meeting, office365, office 365, hotmail, outlook