Smart Filters
Smart Filters in BusyCal offer exceptional customization for dynamic calendar sets and saved searches — all accessible with a single click. Whether you need to quickly toggle between work and personal schedules or filter events based on specific criteria, Smart Filters give you complete control.
Calendar Sets allow you to save and quickly switch between different groups of calendars. BusyCal implements this through Smart Filters, which go beyond simple calendar grouping. Smart Filters can save not just your calendar selections (Calendar Sets), but also your view preferences, time zones, and complex event filtering criteria — providing unprecedented control over your calendar workflow.
With Smart Filters, you can:
- Create Calendar Sets — Instantly switch between predefined groups of calendars (Work, Personal, Family, etc.)
- Filter Events — Show only events that match specific conditions, such as keywords, event types, or tags
- Save View Settings — Remember custom layouts, including columns and sort order in List View
- Switch Time Zones — Save and recall different time zones for dynamic event display when traveling or working globally
To create a Smart Filter, choose Filter > New Smart Filter (or press ⌘-Control-N) and configure your preferred settings. Some examples follow.
Calendar Sets
Calendar Sets allow you to quickly switch between different groups of calendars with a single click. BusyCal implements Calendar Sets through Smart Filters, giving you powerful ways to organize and view your calendars.
For instance, you might have one calendar set that includes all your work-related calendars, another for personal appointments, and a third for family activities. By selecting a particular Calendar Set, BusyCal will display only the calendars included in that set, helping you focus on the relevant events and tasks without the distraction of unrelated calendar entries.
A calendar set can be created by enabling the "Remember visible calendars" option when setting up a new smart filter. This option then remembers and associates your currently "checked" calendars in the side panel with the new smart filter, effectively creating a saved "Calendar Set." By setting up various smart filters as calendar sets, you can conveniently switch between different groups of calendars with just one click.
You can disable this option if you prefer to use the smart filter as a "saved search" that should always apply to the currently selected set of calendars.
Consider creating these common calendar sets for better organization:
- Work - Only work calendars and task lists
- Personal - Personal calendars, birthdays, and family events
- Focus - Just your primary calendar for distraction-free planning
- Everything - All calendars including subscriptions and shared calendars
- Planning - Project calendars and deadline tracking
To create a new calendar set:
- Select the calendars you want to show or hide by checking them in the left sidebar.
- Choose Filter > New Smart Filter or press
⌘-Control-N. - Select “Remember visible calendars,” give the filter a name, like “Work,” and click OK.

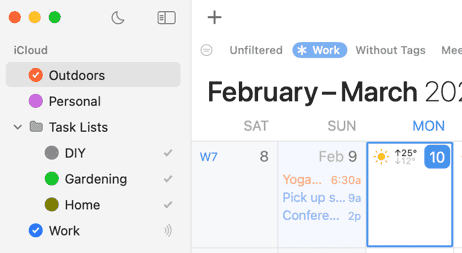
The new calendar set (saved as a Smart Filter) is added to the Filter bar, and clicking it instantly switches to that calendar set. If the filter bar is not showing,
you can enable it from the View menu > Show Filter Bar option (or press ⌘-Control-H).

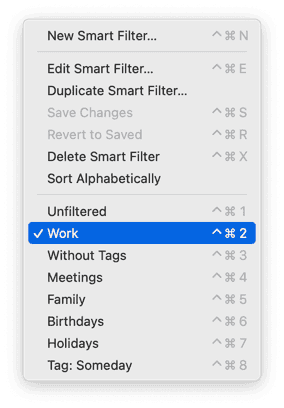
The filter can also be applied by selecting its name from the Filter menu or by pressing its keyboard shortcut. The first smart filter listed is “Unfiltered” with a keyboard shortcut of ⌘-Control-1. You can think of Unfiltered as the standard or default filter. The next smart filter (Work, in this example) corresponds to ⌘-Control-2.
Saving Changes to Calendar Sets
If you show or hide additional calendars by checking them in the left calendar side panel, the Filter button in the toolbar
displays a * (asterisk) next to its name, indicating that the current calendar set has been modified. Changes are discarded
if not manually saved.
BusyCal requires manual saving of calendar set changes. This intentional design allows you to temporarily view additional calendars without permanently altering your carefully configured calendar sets.
When your calendar selection has changed, such as after you uncheck a calendar momentarily:
- To save the changes, choose Filter menu > Save Changes, press
⌘-Control-S, or Control-click the button in the toolbar and choose Save Changes from the contextual menu. - To discard the changes, press
⌘-Control-2(the Work filter’s keyboard shortcut),⌘-Control-R(for Revert), or Control-click the button in the toolbar and choose Revert to Saved from the contextual menu. You can also click on the same filter Work again to revert to previously saved settings.
BusyCal does not automatically save changes to the calendar set. This is an incredibly powerful feature as it allows you to temporarily uncheck / check a calendar only momentarily. Quitting and relaunching the app will revert to previously saved settings.
The Unfiltered is a built-in, default calendar set. When you switch to a different smart filter, your current view settings and calendar selection is automatically saved against Unfiltered. This way, when you switch back to the built-in unfiltered view, your previous calendar selection and view settings are automatically restored.
Content Matching
You can create powerful smart filters to show events that match various conditions, such tasks that contain a certain string of text and that were modified in the last 7 days.
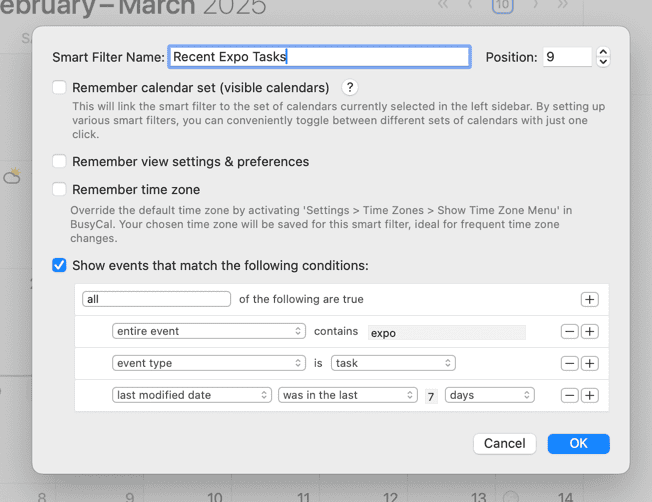
To create a content-matching smart filter:
- Choose Filter menu > New Smart Filter or press
⌘-Control-N. - Select Show events that match the following conditions, configure the settings shown above, name the filter, and click OK.
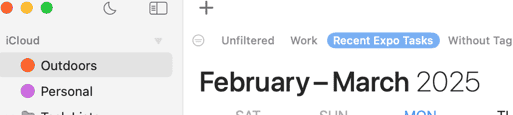
- A button with the smart filter’s name appears on the Filter Bar, and clicking it applies the filter. Note that the filter button appears in blue, which indicates that it is showing only events that match certain conditions.
You can create some pretty sophisticated smart filters for things like:
- Due Date is in the next x days.
- Priority is High.
- Tag contains “Client X”
- Modified in the last x days.
- Location contains “Starbucks”
- Event type is Meeting.
- Meeting Status is Maybe.
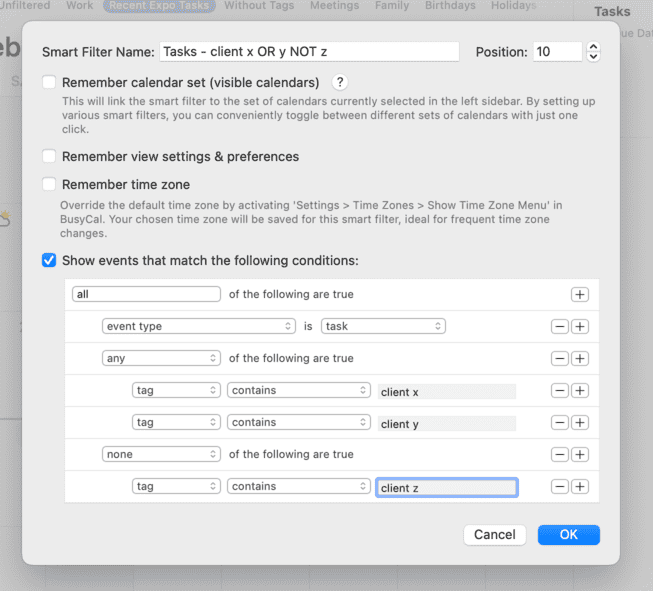
Nested Filters
You can create nested sub-conditions by holding down Option and clicking the ellipsis (…) button, and then choosing All, Any or None for the sub-conditions.
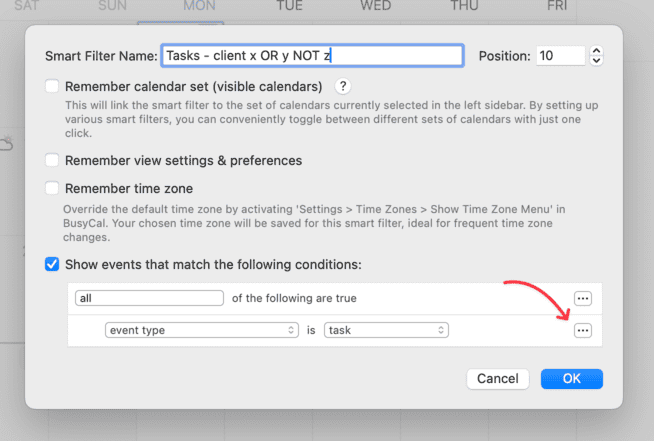
For example, you could create a smart filter that matches ALL event types that are tasks, ANY tags that contain client x or client y, and NONE that have a tag containing client z.
Remember View Settings
You can customize the calendar views in BusyCal, like a 4-day Week, a 3-week Month, or a List view with a custom number of days and columns shown.

You can use smart filters for recalling these custom views with a single click, as follows:
- Customize the current view (e.g., change the number of days or weeks shown in the Week or Month view, or the columns displayed in List view).
- Choose Filter > New Smart Filter or press
⌘-Control-N, select “Remember view settings & preferences,” name the filter, and click OK. - A button with the smart filter’s name appears on the Filter Bar, and clicking it displays the custom view.
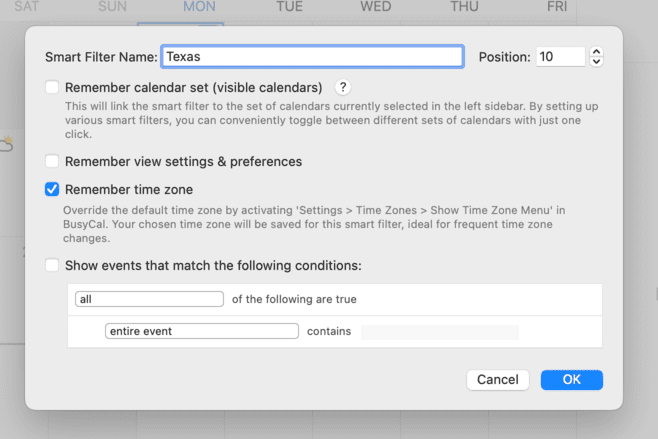
Remember Time Zone
Customize and override your current time zone to dynamically display all events in a different time zone and apply it to new events you create. This is especially useful when traveling, allowing you to keep your calendar aligned without relying on the system time zone.
If you frequently switch between time zones, you can enable Remember Time Zone within a Smart Filter. This lets you save and quickly toggle between preferred time zones and related view settings, streamlining your workflow and improving productivity.
Using Combination Filters
A smart filter can include any combination of calendar set, view settings, and conditions. For example, a smart filter could combine a set of calendars with a 6-week month view. For a more sophisticated example that uses tags as a condition, see Time Tracking.
Smart Filter Use Cases & Ideas
smart filter examples, smart filter use cases, calendar set examples, smart filter templates, productivity workflows smart filters, smart filter ideas, best smart filter setups, smart filter configurations, practical smart filters, smart filter scenarios
Maximize productivity with these practical Smart Filter configurations:
Work/Life Balance
- Work Focus - Show only work calendars + working hours toggle + week view
- Personal Time - Personal calendars + hide work hours + month view
- Weekend Planning - Personal/family calendars + 2-day week view (Sat-Sun)
Project Management
- Active Projects - Filter by project tags + list view sorted by due date
- Client Review - Specific client tag + 90-day week view for quarterly overview
- Deadline Tracker - Tasks due in next 7 days + priority sorting
Time Zone Management
- Home Office - Remember Local time zone + standard work calendar selection
- Travel Mode - Remember Destination time zone + travel calendar selection + compact view
- Global Team - Multiple time zones displayed + meeting calendars only
Meeting Workflows
- Meeting Prep - Today's meetings only + attendee info visible
- Availability Check - Hide all-day events + show free/busy status
- Follow-up Tasks - Events with "follow-up" tag from past week
Planning Views
- Weekly Review - 7-day view + all calendars + tasks visible
- Monthly Overview - 6-week month + no event details + weather visible
- Quarter Planning - 90-day view + project calendars + milestones tagged
Calendar Set Syncing
Smart Filters (including your Calendar Sets) automatically sync across all your macOS devices via iCloud. For iOS users, Calendar Sets sync exclusively between other iOS devices (and not macOS) due to deliberate and technical differences in their implementation.
To create your first Calendar Set in BusyCal, simply set up a Smart Filter with "Remember visible calendars" enabled. This gives you instant access to different groupings of calendars - work, personal, family, or any custom combination you need. Smart Filters extend beyond simple calendar grouping with powerful filtering capabilities.
This enables migrating to a new device easy. Simply install BusyCal on a new device and your existing smart filters should pull directly from iCloud.
To disable Calendar Set syncing, go to Settings > Advanced > Other > Sync Smart Filters & Calendar Sets and toggle the feature off.