Resetting BusyCal
If an error is displayed when launching BusyCal that the file couldn't be opened because it isn't in the correct format, your BusyCal database may be corrupted. You can solve this by resetting BusyCal.
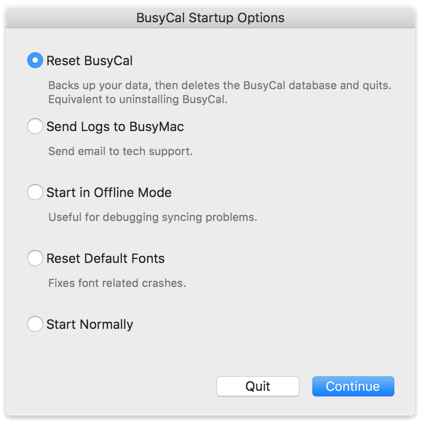
To reset BusyCal:
-
Hold down Option while opening BusyCal.
-
When the Startup Options dialog appears, select Reset BusyCal and click Continue. Resetting BusyCal disconnects from any cloud-based services, deletes your BusyCal database, and quits.
-
After resetting, reopen BusyCal. If you were syncing with a cloud-based service like iCloud or Google and those services do not automatically reappear, you can reconnect to them by choosing BusyCal > Settings > Accounts, and re-adding them.
Any calendars that are hosted on iCloud or Google are preserved and reappear in BusyCal once you connect to the server. If you had any local calendars, those must be manually restored from one of BusyCal’s automatic backups.
Manual Reset
If you're having difficulty launching the app and the above options won't display, you can delete the app's contents and reset it manually by following these steps:
- Open Finder, click on the Go menu and select Go to Folder. Then paste the following as-is:
~/Library/Containers/com.busymac.busycal3/Data/Library/Application Support/BusyCal
In the folder that opens, delete all files that begin with the name BusyCal.bsql (you may find multiple files with similar file extensions).
- Next, launch BusyCal and open Settings > Accounts to be able to re-enter your accounts there.
Note: If syncing with iCloud, you will have to re-enter your iCloud app-specific password for BusyCal. If you have forgotten your iCloud app-specific password, you can create a new one and use the new app-specific password instead. You can learn more about creating an app-specific password here: