BusyCal Menu App
BusyCal includes a menu bar extension app that lets you view and add events with a single click—even when BusyCal isn't running. If you can't find the menu icon, see Can't See the Menu Icon? below.
This extension runs as a separate process called BusyCal Menu & Alarms, which, as the name suggests, also
manages alarms and snooze options. While you can disable and remove the menu bar icon from BusyCal Settings, the process
itself cannot (and should not) be stopped, as doing so would prevent BusyCal from triggering alarms. If you do not wish to see alarms
and do not want BusyCal Menu App to run separately, uncheck the Show alarms setting as described here.
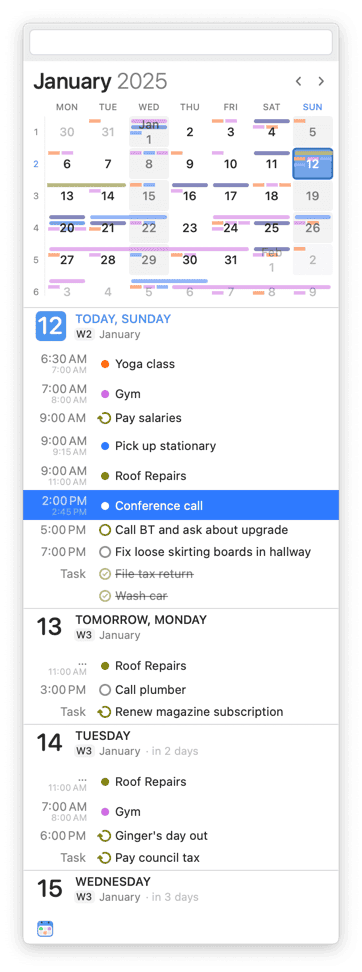
The BusyCal Menu App displays a navigable mini month view, a scrolling list of upcoming events and tasks, the weather forecast for today and upcoming days, and a Quick Entry field for creating new events with natural language. You can detach it into a floating window, resize it both vertically and horizontally, and BusyCal remembers its last on-screen position and size.
To display the menu, click its icon in the menu bar or press ⌘-Control-B. (You can change that shortcut; see Enabling the BusyCal Menu App, just ahead.)
Enabling the BusyCal Menu App
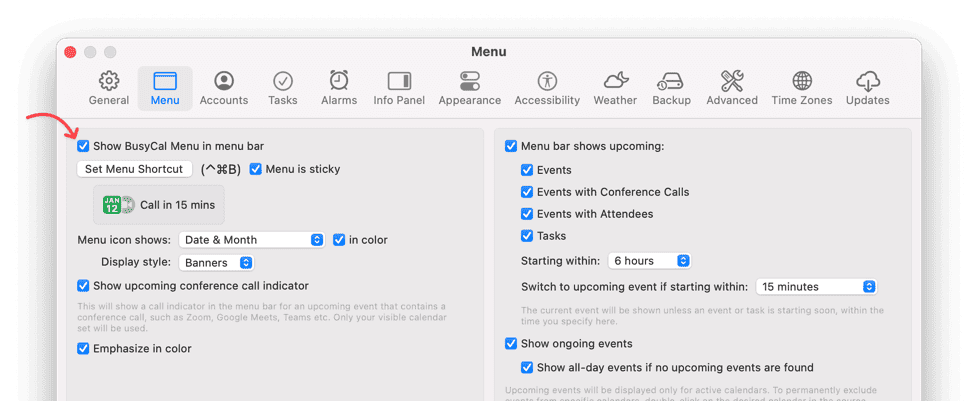
To display the BusyCal Menu App in your menu bar, go to BusyCal menu > Settings > Menu and select the Show BusyCal Menu in menu bar checkbox. This opens a background application that loads at login and continues running even when BusyCal has quit.
You can also set an additional option:
- Set Menu Shortcut — By default, you can press
⌘-Control-Bto display the BusyCal Menu App (as an alternative to clicking the menu bar icon). If you prefer to use a different keyboard shortcut (for example, if you've already assigned⌘-Control-Bto something else), click Set Menu Shortcut, click in the field at the top of the dialog that appears, and press the key combination you want to use to open the BusyCal Menu App. Then click OK.
Detaching (Tearing Out) the BusyCal Menu App
To keep the BusyCal Menu App visible while you work, detach (tear out) the menu into a separate floating window.
Once detached, the BusyCal Menu App remains on screen until you close it, and BusyCal remembers its last on-screen position and size.
To reattach the window, drag it back near the BusyCal Menu App icon in the menu bar.
Using the BusyCal Menu App
With the BusyCal Menu App open, you can do the following:
- Detach (tear out) the menu if you want to keep it open while working in other windows and apps.
- Click the left or right arrow button to move across any number of months in either direction.
- Scroll the list of daily events and tasks using your trackpad, Magic Mouse, or scroll wheel; the agenda supports infinite scrolling.
- Click on a date in the mini month to scroll the list of events to that date.
- Click or use the arrow keys to select an item and view its details.
- If the item is a task, you can mark it as complete by clicking the done checkbox.
- Double-click an event, or press Return with an event selected, to open the event in BusyCal.
- Create new events / tasks using natural language in the Quick Entry field at the top of the menu.
- If you close the Alarm window, click the alarm button in the footer of the BusyCal Menu App window to reopen it.
BusyCal Menu App Behavior
The BusyCal Menu App is a lightweight calendar extension that resides in the menu bar and is optimized for quick access.
Main App Interaction
BusyCal Menu App runs as its own background process (BusyCal Menu & Alarms) and now handles menu interactions without forcing the main BusyCal app to launch.
You can continue browsing and interacting from the BusyCal Menu App even when the main app is closed.
Month Navigation and Agenda Range
You can now navigate freely across any number of months, both backward and forward.
The agenda list supports infinite scrolling.
For full calendar access and advanced features, please use the main BusyCal app.
Alarm Handling in the BusyCal Menu App
Alarm snoozing and dismissal are handled by the BusyCal Menu App without launching the main BusyCal app. Snoozed alarms persist across app restarts, so you won't lose them if BusyCal or the Menu App is relaunched. You can view all currently snoozed alarms using the snooze badge in the Alarm window.
If you close the Alarm window, you can reopen it using the alarm button in the footer of the BusyCal Menu App window.
Upcoming Events Display and Countdown in the BusyCal Menu App
The BusyCal Menu App shows a real-time event countdown in your menu bar:
- Upcoming event countdown: How much time until your next event starts
- Ongoing event progress: How much time has elapsed during current events
- Event details: Title, time, and location at a glance

The countdown stays visible even when the main app is closed.
Customizing the Upcoming Events Display
To activate and customize this feature:
- Ensure the BusyCal Menu App is enabled in your menu bar
- Go to BusyCal Settings > Menu
- Configure options like showing event countdown, event duration, and which events to display
Excluding Specific Calendars from Upcoming Event Countdown
The upcoming event countdown reflects whichever calendar set is selected in the main app. To permanently exclude specific calendars from the upcoming event list:
- Double-click the calendar name in the left Calendar List.
- Uncheck the option Show upcoming events in menu bar.
- Click OK.
⚠️ Troubleshooting
The BusyCal Menu & Alarms extension process triggers and handles alarms in the background (also called the Alarm Helper App). macOS is responsible for keeping the main app connected to this extension app, even though the extension process comes bundled with the main app at install time.
If the BusyCal Menu App is:
- Not showing / refreshing your selected calendars or events, or appears blank
- You get an alert such as
Uh-oh! Could not communicate with the Alarm app - The menu bar app is not visible in the macOS Menu Bar, or
- The app is not triggering any alarms
- Not showing upcoming or ongoing event titles in the macOS menu bar
Follow these steps to resolve the issue as it seems macOS is unable to pair the main app with its menu bar extension (option 5 below normally always helps if you have followed through all the rest):
🔒 Ensuring BusyCal Has the Correct System Permissions
To function properly, BusyCal requires the Allow in the Background system permissions under System Settings > General > Login Items & Extensions
Versions of BusyCal that predate macOS 15 (any version of BusyCal below 2024.4.1) will not work on the latest version of macOS as the Alarm Helper App is not compatible. You must update your copy.
Since macOS 26.0, menu bar apps can be hidden. Open System Settings > Menu Bar and make sure BusyCal is enabled.
On macOS Tahoe, the BusyCal background permission may appear as a Dock Tile toggle (after clicking the (i) button next to BusyCal under Allow in the Background). Enable it, then quit and relaunch BusyCal.
macOS prompts for these permissions when the app is first launched. If you accidentally clicked "Disallow", BusyCal will be unable to launch its alarm helper extension and alarms will fail to trigger.
How to Check and Enable Permissions:
- Open System Settings and navigate to General > Login Items & Extensions.
- Scroll to the Allow in the Background section.
- Find BusyCal. If there's a toggle switch next to it, enable it. If you see an (i) button instead, click it and enable Dock Tile (and Allow in the Background, if shown).
- In case you do not see BusyCal listed, please drag
BusyCal.appto the Trash from under Applications, and re-download the app - this will force macOS to refresh this list.
Quit and relaunch BusyCal for the change to take effect, then test an event alarm.
🛠️ Where Is the Menu Icon? Troubleshooting Missing Menu Bar Icons
macOS has limited space for menu bar icons—especially on laptops or models with a notch. If BusyCal's icon isn't showing or has disappeared, or upcoming event titles aren't visible, the icon may be hidden due to lack of space.
Common Reasons the Menu Icon Might Not Be Visible:
- Menu bar is full: Too many menu bar items competing for space
- MacBook with notch: The notch in newer MacBooks can hide menu icons in the center area and can reduce the amount of space dedicated to app icons
- System settings: Background Items permissions might be disabled
- Menu icon disabled: The menu option might be turned off in BusyCal Settings
- Menu process not running: The menu extension process might need to be restarted
First Check: Is the Menu Icon Enabled?
- Open BusyCal
- Go to BusyCal menu > Settings > Menu
- Ensure Show BusyCal Menu in menu bar is checked
- Click OK and wait a moment for the icon to appear
Fixing a Full Menu Bar:
- Try quitting some other apps that display menu bar icons to free up space
- Hold down the Command (⌘) key and drag the BusyCal icon (if visible but in an inconvenient location) closer to the clock
- Consider using a menu bar manager app like Bartender if you have many menu bar icons
MacBook Notch Issues:
If you have a newer MacBook with a display notch, the menu bar icons can disappear behind it. This is especially true if you have enabled the Menu Bar to Show Upcoming Event titles, the amount of space required to fit both the icon + the event title may be more than what's available. Try the following:
- Hold Command (⌘) and drag any visible menu bar icons away from the center notch area
- Position critical icons like BusyCal closer to the right side of the menu bar
- Check Control Center (the icon next to your clock) to see if macOS has automatically hidden some menu extras there
- Try reducing your display scale in System Settings > Displays to give the menu bar more space
The notch on newer MacBooks can hide menu icons that sit near the center of the menu bar.
🛠️ Option 2. Force Restart the BusyCal Menu App
- Open Activity Monitor (
Applications > Utilities > Activity Monitor.app). - Search for "BusyCal Menu"—you should see only one instance running named
BusyCal Menu & Alarms. - Select it and click the Quit (X) button in the toolbar.
- The extension restarts automatically because macOS manages its lifecycle. Force-quitting simply makes macOS relaunch it and reconnect to the main app.
- Relaunch BusyCal.
- Open BusyCal Settings > Menu, uncheck "Show BusyCal Menu in Menu Bar", and wait for about a minute.
- Re-enable "Show BusyCal Menu in Menu Bar" and check if the issue is resolved.
🛠️ Option 3. Ensure There Are No Duplicate Copies of BusyCal.app Installed
- Use Spotlight Search (
Cmd + Space) and search for "BusyCal.app". - Verify that only one copy exists in
/Applications/. - If you find additional copies (e.g., in
Downloadsor another folder), delete them.
- macOS may mistakenly launch the menu extension for an outdated or incorrect version if there are more than one
copies of the app on disk. We have even witnessed macOS launch an archived copy from
Time Machineso anything is possible.
🛠️ Option 4. Restart Your Mac
A reboot can often resolve communication issues between the main app and its menu bar extension, as macOS background services can occasionally get out of sync.
🛠️ Option 5. Reset macOS Background Tasks (Last Resort)
If the issue persists, resetting macOS's link to the menu extension may help. Note that this resets background task management for all installed apps—you'll see the Allow / Disallow prompt again for other apps after the reset.
That said, this is often the only solution that works when other steps fail.
- Open Terminal (
Applications > Utilities > Terminal.app). - Enter the following command and press Return:
sfltool resetbtm
- Restart your Mac and check if the BusyCal Menu App is now working correctly. Check by creating a test alarm that fires within the next couple of minutes.
Frequently Asked Questions About BusyCal Menu App
Why does BusyCal launch when dismissing alarms?
Snoozing or dismissing alarms from the BusyCal Menu App is handled without launching the main BusyCal app.
If BusyCal still launches when you dismiss or snooze alarms, update to the latest version and follow the troubleshooting steps above.
Why can't BusyCal Menu App show more past events?
BusyCal Menu App supports unlimited month navigation and infinite agenda scrolling.
If you still see a constrained range, restart the BusyCal Menu App and ensure you are on the latest release.
Why doesn't the BusyCal Menu App stay in sync when the main app isn't running?
BusyCal Menu App runs as a lightweight extension process and may briefly show cached data while refreshing in the background.
If events appear stale, launch BusyCal to trigger an immediate sync, then reopen the BusyCal Menu App.